In summary:
- Successful e-bike touring is less about a packing list and more about a strategic mindset focused on power, weight, and redundancy.
- Prioritize power logistics: a dual-battery system is crucial for mountain terrain, and planning charging stops is a non-negotiable part of your route.
- Master dynamic load balancing, aiming for a 40% front and 60% rear weight distribution to maintain stability and control.
- Prepare for specific failure points, such as carrying spare spokes appropriate for the higher torque of an e-bike hub.
- Balance machine and human energy by scheduling recovery days, which benefit both your legs and your batteries’ long-term health.
The dream of a self-supported e-bike tour is intoxicating: silent roads, sweeping landscapes, and the quiet hum of a motor assisting you toward the horizon. For many cyclists planning their first multi-day trip, the immediate impulse is to search for a packing list. You’ll find countless articles telling you to bring a rain jacket, a spare tube, and snacks. While this advice isn’t wrong, it completely misses the central challenge and reward of e-bike trekking.
The conventional wisdom of “pack light” and “bring a repair kit” is insufficient for a journey where your primary power source is a finite electrical charge. The real art of preparing for an autonomous e-bike adventure lies not in the items you carry, but in the strategic thinking you apply before you even strap a pannier to your rack. It requires a shift from a simple checklist mentality to one of logistical planning and risk management.
But what if the key to a successful trip wasn’t just having a spare battery, but understanding the fundamental trade-offs between different power systems? What if true preparation meant anticipating the one unique part that could fail 50 miles from the nearest bike shop? This guide is built on that very premise. It moves beyond the what and dives deep into the why and how, transforming your approach from a hopeful packer into a confident adventure strategist.
This article will guide you through the critical logistical pillars of a self-supported e-bike tour. We will explore power systems, weight distribution, charging strategies, and proactive maintenance to equip you with a robust framework for your next journey. Prepare to think less like a tourist and more like an expedition leader.
Summary: E-Bike Trekking Essentials: A Strategic Packing Guide
- Why Dual Battery Systems Are Essential for Mountain Touring
- How to Distribute Weight Between Front and Rear Panniers
- Hotels vs Campgrounds: Charging Logistics for E-Bikers
- The Risk of Unique Spokes Breaking in Remote Areas
- Recovery Days: Scheduling Breaks to Save Legs and Battery
- Dual Battery vs Spare Battery in Backpack: Which Is Better?
- Planning Charging Stops: Identifying Restaurants with Outlets
- Smartphone vs Dedicated GPS Unit: What to Use for 50-Mile Rides?
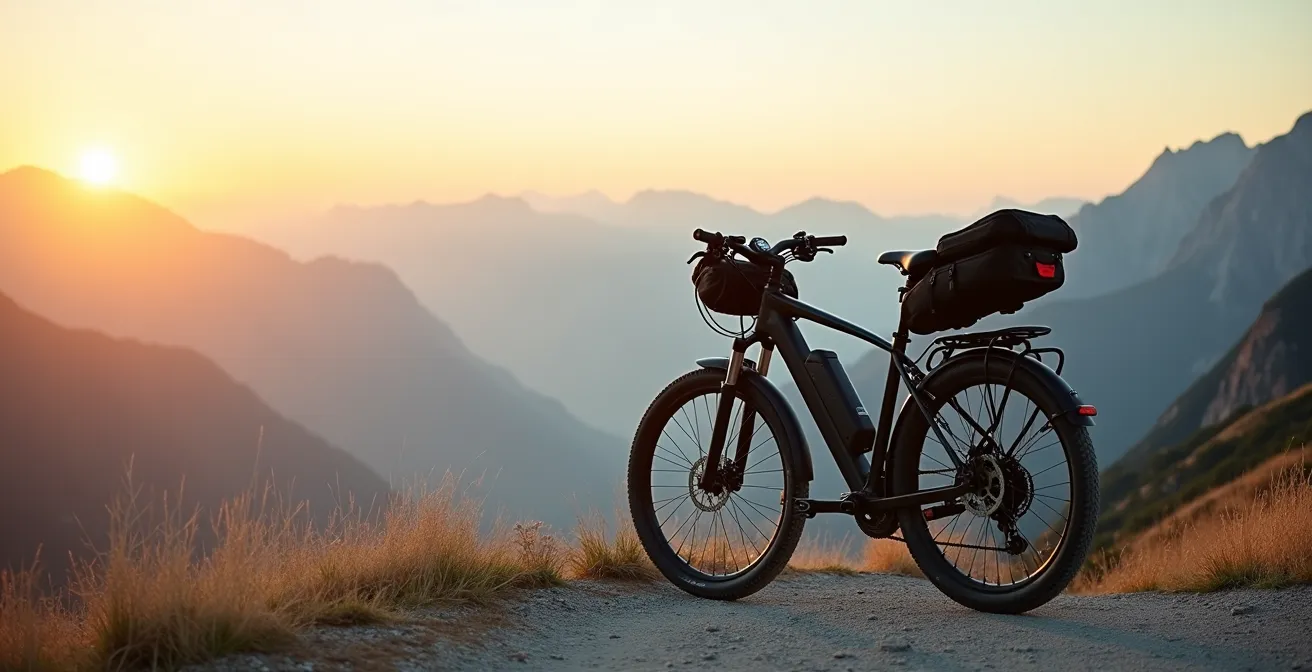
Why Dual Battery Systems Are Essential for Mountain Touring
For flat terrain, a single battery is often sufficient. But once you introduce the steep gradients and sustained climbs of mountain touring, the energy demands on your e-bike multiply exponentially. A dual-battery system isn’t a luxury in this environment; it’s a fundamental component of your power logistics strategy. It provides the security to tackle unexpected detours, battle headwinds, and use higher assist levels without the constant anxiety of running out of power miles from your destination.
The added capacity transforms your trip from a range-anxious scramble to a confident exploration. Modern systems offer immense potential, with some setups capable of an extended range of up to 300 kilometers with dual 800Wh batteries under ideal conditions. While real-world mountain conditions will reduce this, the buffer it provides is critical. This extended range allows you to plan more ambitious routes, link remote areas, and fully embrace the freedom of the ride.
A dual-battery setup, especially one integrated into the frame, also contributes to a lower center of gravity, which improves handling on technical descents and challenging climbs. It’s a proactive investment in strategic redundancy, ensuring that a single depleted battery doesn’t end your day’s journey prematurely. This is the first and most important step in building an autonomous e-bike touring setup.
How to Distribute Weight Between Front and Rear Panniers
Once you’ve secured your power system, the next logistical challenge is managing weight. The added mass of batteries, a motor, and charging equipment makes an e-bike significantly heavier than a traditional touring bike. Proper weight distribution—or dynamic load balancing—is therefore not just about comfort, but about safety and control. An improperly loaded e-bike can feel sluggish, unstable on climbs, and dangerously unpredictable during descents.
The goal is to maintain the bike’s intended handling characteristics by keeping the center of gravity low and balanced. A proven strategy is to aim for a 40% front, 60% rear weight distribution. This approach keeps enough weight over the front wheel to ensure traction and steering control while concentrating the bulk of the weight closer to the bike’s center of mass. A real-world test by riders on the King Alfred’s Way found that this method provided optimal handling for multi-day e-gravel adventures.
This organized packing system is key to achieving the right balance. Visualize your gear in tiers to make it functional.
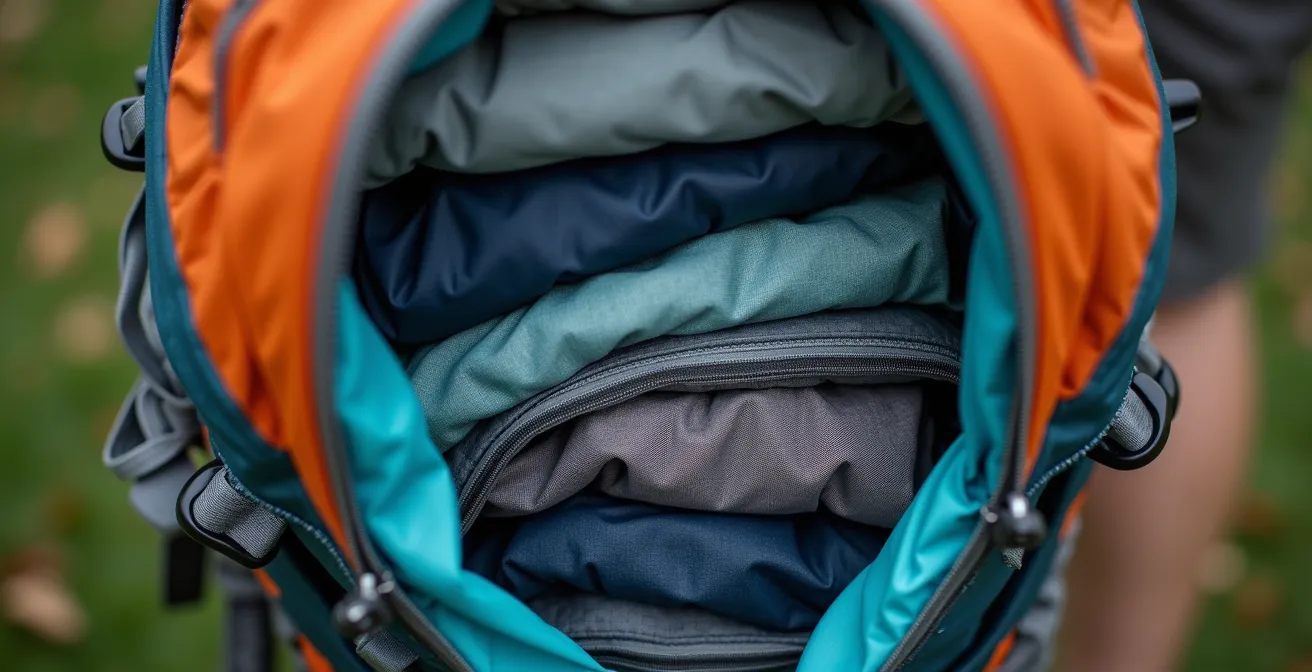
As seen in this organized setup, a tiered approach works best. Pack your heaviest items, like tools and spare battery chargers, low and close to the frame in the rear panniers. Lighter, bulkier items such as a sleeping bag or clothes can go on top. Use front panniers or fork cages for lightweight, frequently accessed gear like rainwear, snacks, and navigation tools. This keeps the front end responsive and prevents the “wheel flop” that can make slow-speed maneuvers difficult.
Hotels vs Campgrounds: Charging Logistics for E-Bikers
Your e-bike’s batteries are its lifeblood, and planning how to replenish them is as critical as planning your route. The choice between staying in hotels versus campgrounds has significant implications for your power logistics. Each option presents a different set of opportunities and challenges regarding charging access, security, and convenience. A smart tourer plans for both and is equipped for any scenario.
Hotels offer the most straightforward solution: guaranteed indoor outlets, security for your expensive bike and batteries, and protection from the elements. However, this comes at a higher cost. Campgrounds are more budget-friendly and immersive but introduce uncertainty. While many campgrounds offer powered sites, the outlet on a pedestal might be far from your tent, exposed to weather, and less secure. You must be prepared to lock your battery and bike while charging and have a waterproof cover for the charging port.
The following table, based on data from multi-day touring analysis, breaks down the key differences in charging locations.
| Location Type | Charging Access | Security | Cost | Weather Protection |
|---|---|---|---|---|
| Hotels | Indoor outlets guaranteed | High – locked room | $80-150/night | Complete |
| Campgrounds | Power pedestals common | Low – outdoor exposure | $20-40/night | Limited |
| Restaurants | Permission required | Medium – supervised | Free with meal | Indoor charging |
| Libraries | Usually available | High – indoor | Free | Complete |
Regardless of your accommodation choice, a well-prepared contingency kit is essential for overcoming charging hurdles. Being self-sufficient means you can adapt to any situation, whether it’s an oddly placed outlet in a hotel room or a shared power post at a campsite.
Your Action Plan: Charging Contingency Kit
- Pack a 15ft heavy-duty extension cord to reach distant outlets.
- Include a universal plug adapter set for international or varied compatibility.
- Carry a waterproof battery port cover for charging in semi-exposed conditions.
- Bring a lightweight cable lock specifically to secure your battery and charger outdoors.
- Consider a portable power meter to verify an outlet is functional before you walk away.
The Risk of Unique Spokes Breaking in Remote Areas
While a flat tire is a common and easily fixable roadside issue, an e-bike introduces more specific and complex potential failure points. One of the most critical is a broken spoke. The increased weight and motor torque of an e-bike, particularly with hub motors, place immense stress on the wheels. A broken spoke on a heavily loaded touring e-bike can quickly lead to a wobbling, untrue wheel that is unsafe to ride, potentially halting your trip in a remote area.
This is a classic case for failure point analysis. Instead of carrying a generic, bulky repair kit, a strategist identifies the most likely and debilitating failures and prepares specifically for them. E-bike wheels often use thicker, non-standard spokes that you won’t find at a small-town hardware store. According to field reports from long-distance e-bike tourers, hub motor wheels typically require robust 13-14 gauge spokes, compared to the 15 gauge common on non-electric bikes. Being stranded for lack of a $2 part is the definition of a preventable failure.
The solution is to be your own mechanic-in-the-field, carrying the exact parts your specific bike needs.

True self-sufficiency means having the right tools and a few critical spares. Before your trip, identify the specific spoke lengths your wheels use (drive-side and non-drive-side lengths can differ). Pack 3-4 of each, a spoke wrench, and an emergency fiber-fix spoke for quick, temporary repairs. This small, lightweight kit provides immense peace of mind and turns a trip-ending disaster into a manageable 30-minute fix.
Recovery Days: Scheduling Breaks to Save Legs and Battery
In the excitement of planning a multi-day tour, it’s easy to focus solely on the bike’s energy and forget the rider’s. A successful tour, however, depends on a sustainable energy economy that manages both human and battery power. Pushing day after day without rest is a recipe for physical burnout and can also be detrimental to your equipment. Scheduling planned recovery days is not a sign of weakness; it’s a mark of a smart and experienced tourer.
A “zero day” (a day with no riding) allows your muscles to recover, reducing the risk of injury and ensuring you feel strong for the next leg of the journey. But the benefits extend directly to your power system. As e-bike touring experts point out, this downtime is also crucial for your batteries.
A day of rest allows for a full, slow charge cycle for the batteries, which is better for their long-term health and ensures they start the next leg at 100% capacity.
– E-bike touring experts, Ultimate Guide to Multi-Day E-Bike Tours
Constantly fast-charging batteries during quick lunch stops can generate heat and stress, potentially affecting their long-term lifespan. A full, slow, uninterrupted charge cycle during a rest day helps balance the battery’s cells and maintains its overall health. This ensures you leave with maximum power and efficiency for the demanding days ahead, contributing to better overall performance. Planning a rest day every three to four days of riding is a wise strategy for any tour longer than a weekend.
Dual Battery vs Spare Battery in Backpack: Which Is Better?
The question of how to carry extra power is a central strategic decision. While we’ve established the need for more capacity, the method—an integrated dual-battery system versus carrying a loose spare in a backpack or pannier—has significant implications for weight distribution, safety, and riding comfort. There is no single “best” answer, only the best choice for your specific needs and priorities.
An integrated dual-battery system is the more elegant solution. The batteries are mounted directly to the frame, keeping the center of gravity low and preserving the bike’s handling. Switching between batteries is often seamless, done with the press of a button. However, this system can represent a single point of failure if the controller or wiring has an issue. It’s a streamlined but potentially less redundant option.
Carrying a spare battery in a backpack offers true strategic redundancy. It’s a completely independent power source. If your primary battery or its connection fails, you have a full backup. The downsides are significant: an 8-10 lb battery on your back causes fatigue over a long day, raises your center of gravity, and can be extremely dangerous in a fall. A better alternative is to store the spare low in a pannier, but this still requires a manual, stop-and-swap process. The following comparison highlights the key trade-offs.
| Feature | Integrated Dual Battery | Spare in Backpack |
|---|---|---|
| Weight Distribution | Low center of gravity on frame | 8-10 lbs on shoulders/back |
| Switching Method | Automatic or button press | Manual swap required |
| Redundancy | Single point of failure risk | True independent backup |
| Riding Comfort | No back strain | Increased fatigue over 6+ hours |
| Fall Safety | Protected on frame | Dangerous in crash |
For most leisure tourers focused on handling and comfort, the integrated dual system is superior. For hardcore adventurers prioritizing ultimate backup security above all else, a spare battery (stowed in a pannier, not a backpack) might be the preferred choice. Your decision reflects your personal risk tolerance and touring style.
Planning Charging Stops: Identifying Restaurants with Outlets
Even with a dual-battery system, a multi-day tour will require “opportunity charging”—topping up your batteries during daytime stops. A 90-minute lunch break can be more than just a meal; it can be a strategic power boost that adds 20-30 miles of range to your afternoon. The key is to proactively identify locations with accessible power outlets, and restaurants are just one of many possibilities.
Success here depends on a combination of technology and etiquette. Apps like PlugShare are invaluable tools, allowing you to filter for standard wall outlets (like NEMA 5-15 in North America) and see user-submitted photos and comments. However, always ask permission politely before plugging in. A friendly explanation of your journey often turns a hesitant manager into an enthusiastic supporter. In fact, experienced e-bike tourers report that public libraries, community centers, and even small-town fire stations are often more welcoming than busy restaurants.
Thinking creatively opens up even more options. For example, riders on long-distance treks have found reliable power and shelter at unexpected places. One tourer noted success at coin-op laundromats and covered picnic shelters in state parks. These spots offer protection from the weather, a place to sit, and accessible outlets, allowing you to rest and reorganize gear while gaining precious watt-hours. A 4A fast charger can add around 200Wh, or 30-40% of a standard battery, during a 90-minute lunch stop, significantly extending your day’s range.
Key takeaways
- Adopt a strategic mindset: Focus on the logistics of power, weight, and failure, not just a simple packing list.
- Power is paramount: A dual-battery system is non-negotiable for mountain terrain, and a charging contingency kit is essential for all tours.
- Balance is safety: Aim for a 40% front / 60% rear weight distribution and pack heavy items low and central to maintain control.
Smartphone vs Dedicated GPS Unit: What to Use for 50-Mile Rides?
Reliable navigation is the final pillar of a successful self-supported tour. While your smartphone seems like the obvious all-in-one solution, relying on it as your sole navigation tool is a significant risk. For a multi-day trip, a dedicated GPS unit is a superior and safer choice, embodying the principle of strategic redundancy by separating your navigation system from your communication and emergency device.
The primary issue with a smartphone is battery consumption. With the screen on and GPS tracking active, a phone’s battery life is drastically reduced. Real-world testing demonstrates a maximum of 4-5 hours of battery life when using a smartphone for continuous navigation, which is insufficient for a full day of touring. A dedicated GPS unit, like those from Garmin or Wahoo, offers 15-20 hours of life, easily covering your longest riding days without draining your vital communication link.
Furthermore, dedicated units are built for the rigors of the outdoors. Their screens are designed for excellent visibility in bright sunlight, they are fully waterproof (often IPX7 rated), and they feature physical buttons that can be operated with gloves on. A smartphone is fragile, hard to read in the sun, and its touchscreen is useless in the rain or with gloves. In short, a GPS unit is a tool designed for a single, critical purpose, while a phone is a jack-of-all-trades that excels at none in a harsh outdoor environment. Using your phone as a backup is smart; using it as your primary navigator is a gamble.
By shifting your mindset from a simple packer to a thoughtful strategist, you transform preparation from a chore into an empowering part of the adventure. You are now equipped not just with gear, but with the logistical framework to confidently plan and execute your own self-supported e-bike tour. The open road is waiting.