
The right bike frame isn’t about gender or simple ease of use; it’s a critical engineering trade-off between structural rigidity for performance and an accessible design for practicality.
- High-step (or step-over) frames use a classic triangle for superior torsional rigidity, making them ideal for heavy loads, off-road conditions, and aggressive riding.
- Step-through frames prioritize a lower center of gravity and effortless mounting, but require significant reinforcement and thicker tubing to handle a true payload without excessive flex.
Recommendation: Choose a high-step for performance and heavy cargo, a mid-step for a balanced compromise, and a well-built step-through for maximum accessibility and urban convenience.
Choosing a new bicycle often starts with a simple question: step-through or high-step? For decades, this choice was framed by outdated gender stereotypes—the “ladies’ bike” versus the “men’s bike.” This simplistic view misses the point entirely. The geometry of a bike frame is one of the most fundamental engineering decisions, a choice with deep implications for everything from handling and stability to how much you can safely carry. It’s a decision that should be driven by ergonomics, lifestyle, and intended use, not tradition.
Many riders with limited flexibility, those who wear professional attire for their commute, or simply anyone making frequent stops in city traffic instinctively gravitate towards the step-through. Its appeal is obvious. But the conversation often stops there, ignoring the critical engineering principles at play. The absence of a top tube is not a minor design tweak; it fundamentally changes how forces are distributed across the entire structure, demanding different materials, reinforcement, and design considerations to achieve a safe and comfortable ride.
This article moves beyond the surface-level discussion of accessibility. We will explore the biomechanical and structural trade-offs inherent in each design. Instead of asking which is “easier,” we’ll ask which is better engineered for *your* specific needs. Is a frame’s torsional rigidity more important than its standover height for your use case? How does frame geometry impact payload capacity and motor torque on an e-bike? The true key is to understand that you’re not just choosing how you get on your bike; you’re choosing a specific platform engineered with a distinct purpose in mind.
By examining the science behind frame construction, from material choices to the nuances of steering dynamics, we will equip you with the knowledge to select a frame that is not just a good fit for your body, but a perfect match for your life.
Summary: Understanding the Engineering of Your Next Bike Frame
- Why Height Charts Are Often Wrong for Short Riders
- How to Distinguish a Real SUV E-Bike from a Marketing Gimmick
- Payload Capacity: Choosing a Bike That Supports You + Cargo
- The Mistake of Buying a Fat Tire Bike for City Commuting
- Modular Frames: Buying a Bike That Grows with Your Family
- Why Linkage Steering Feels Twitchy at First (And How to Adapt)
- Step-Through vs Mid-Step: Which Offers the Best Balance?
- Step-Through Frames: Why Accessibility Matters for Riders Over 60
Why Height Charts Are Often Wrong for Short Riders
One of the first tools a potential bike buyer encounters is the manufacturer’s height chart. While intended to be helpful, these charts often oversimplify a complex ergonomic equation, leading to poor fit, especially for shorter riders. They typically rely on a single metric like standover height, ignoring the more critical dimensions that dictate comfort and control. The distance that truly defines how a bike feels is not how high the top tube is, but how far away the handlebars are.
This is where understanding two key concepts becomes crucial: Frame Reach and Effective Top Tube (ETT). Reach is the horizontal distance from the center of the bottom bracket to the center of the head tube. It is the most significant determinant of how stretched out you’ll be when standing on the pedals. ETT, on the other hand, measures the horizontal distance from the head tube to the seat post, giving you an idea of the seated cockpit length. However, ETT can be misleading on its own. For instance, a bike’s seat tube angle has a huge effect on ETT but zero effect on Reach, meaning two bikes with the same ETT can feel completely different.
For shorter riders, prioritizing Reach and a related metric, Stack (the vertical distance from bottom bracket to head tube), is essential. A bike with a shorter Reach and appropriate Stack will provide a more comfortable, upright position, reducing strain on the back and shoulders. Furthermore, smaller frames can introduce other issues, like toe overlap with the front wheel, especially on bikes with 700c wheels. Considering factors like crank arm length—swapping stock 170-175mm arms for shorter 155-165mm ones can dramatically improve knee mechanics—is another step beyond the basic height chart.
Ultimately, a height chart is a starting point, not a verdict. A bike’s true size is a multi-dimensional story told by its full geometry chart, and learning to read it is the first step toward finding a perfect fit.
How to Distinguish a Real SUV E-Bike from a Marketing Gimmick
The term “SUV E-Bike” has become a popular marketing buzzword, promising a do-it-all machine that’s both rugged and practical. However, many bikes given this label are little more than standard models with wider tires and a rack. A true SUV e-bike, especially one with a step-through frame, requires specific engineering to handle the increased stress of cargo and varied terrain. The key is knowing where to look for signs of genuine structural integrity.
Because a step-through frame lacks the support of a top tube, it must be built with a more robust structure. This isn’t just about using a standard frame; it involves using thicker gauge tubing and adding visible reinforcement gussets at high-stress areas like the head tube and bottom bracket. This robust construction is necessary to prevent dangerous frame flex under load. Furthermore, a well-designed step-through SUV e-bike will have a geometry that intentionally lowers the center of gravity, which is crucial for maintaining control and maneuverability when carrying cargo or a passenger.
Beyond the frame itself, the components reveal the bike’s true capability. Real SUV e-bikes use thru-axles instead of flimsy quick-release skewers to increase wheel stiffness and security. Their braking systems are often powerful 4-piston hydraulic brakes, designed to stop a heavier load safely, rather than standard 2-piston or mechanical brakes. Even the spokes are a tell-tale sign; look for heavy-duty 12g or 13g spokes that can withstand the added forces. These details separate a purpose-built utility vehicle from a marketing gimmick.
This table breaks down the key differences between a genuinely capable e-bike and one that just looks the part.
| Feature | Real SUV E-Bike | Marketing Gimmick |
|---|---|---|
| Frame Construction | Visible reinforcements at head tube and bottom bracket | Standard frame with add-ons |
| Wheel Attachment | Thru-axles for stiffness | Quick-release skewers |
| Braking System | 4-piston hydraulic brakes | Standard 2-piston or mechanical |
| Motor Integration | Mid-drive with low central battery placement | Hub motor with rack-mounted battery |
| Spoke Gauge | Heavy-duty 13g or 12g spokes | Standard spokes |
When you’re investing in a bike to be a reliable workhorse, looking past the paint and at the core engineering is the only way to ensure you’re getting a vehicle that’s truly up to the task.
Payload Capacity: Choosing a Bike That Supports You + Cargo
A bicycle’s payload capacity is the total weight it can safely carry, including the rider, cargo, and any accessories. This is arguably the most important, yet often overlooked, specification for anyone planning to use their bike for more than just recreational rides. The difference in how high-step and step-through frames manage this load is dramatic and comes down to a fundamental principle of engineering: frame triangulation.
A high-step, or diamond, frame forms a classic, rigid triangle. This shape is inherently strong and efficient at distributing forces from the rider and cargo across the structure. As the ECORUSH Engineering Team notes, “The high-step frame provides exceptional rigidity, making it ideal for riders who demand maximum performance. The design efficiently distributes weight and force, allowing the bike to handle heavier loads and more intense riding conditions.” This inherent strength is why high-step frames are the universal standard for touring, bikepacking, and heavy-duty cargo applications where minimizing frame flex is paramount for stability and efficient power transfer.
A step-through frame, lacking the top tube, essentially functions as a single, large beam. It must be significantly overbuilt with thicker, heavier tubing to resist the twisting forces (torsional flex) that a loaded bike experiences. While a well-built step-through can certainly be strong, it will almost always be heavier and more prone to subtle flex than a high-step frame of equivalent strength. This is especially noticeable when cornering with a heavy load on a rear rack, where flex can create a vague or “wobbly” handling sensation. The distribution of this weight is also key; even on standard bikes, a typical weight distribution is around 35% on the front and 65% on the rear, and this bias is often exacerbated by rear-mounted cargo.
The image below illustrates the structural differences at key junction points, highlighting the additional material and reinforcement required in step-through designs to compensate for the lack of a top tube.
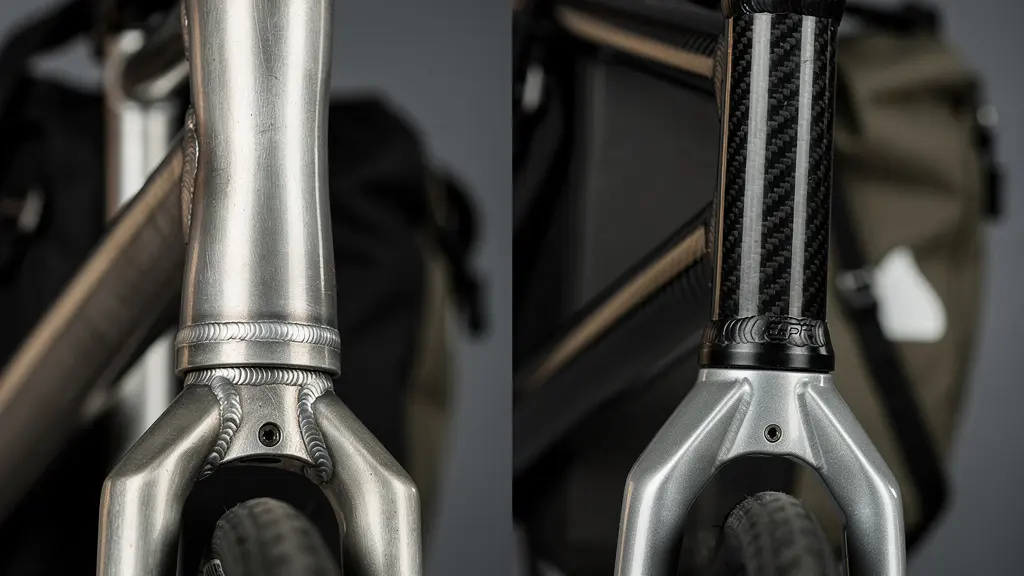
As you can see, the choice is a direct trade-off. The high-step’s superior structural efficiency makes it the clear winner for performance under load, while the step-through must rely on brute strength and added material to achieve a similar, though not identical, level of stability.
Therefore, when you see a payload capacity listed, consider the frame type. A 300 lb capacity on a high-step frame will likely feel more stable and responsive than the same capacity on a step-through, simply due to the physics of its design.
The Mistake of Buying a Fat Tire Bike for City Commuting
Fat tire bikes have a commanding presence and promise a cloud-like ride, absorbing bumps and potholes with ease. This makes them seem like an ideal choice for navigating rough city streets. However, for daily commuting, this perceived benefit comes with a host of significant, often hidden, drawbacks that make them a surprisingly impractical choice. The biggest and most immediate impact is on efficiency and range.
Those wide, soft tires create a massive contact patch with the pavement, which translates to enormous rolling resistance. On a regular bike, this means you’ll be working much harder to maintain speed. On an e-bike, the cost is paid by your battery. The extra effort required to push those tires can lead to a staggering 30-40% reduction in battery range compared to a bike with standard commuter tires. What might be a 40-mile range on a standard e-bike could shrink to just 24-28 miles, potentially not even enough for a round-trip commute without a recharge.
Beyond efficiency, the physical dimensions of fat tire bikes create practical headaches. The wide cranksets required to clear the frame result in a very high Q-factor—the horizontal distance between the pedals. This wide stance can force the hips, knees, and ankles into an unnatural alignment, leading to discomfort or even injury over time for many riders. Their bulk also makes them incompatible with most public transit bike racks and difficult to carry up stairs or store in an apartment. Even simple maintenance can become a chore, as replacement tubes and tires are often more expensive and harder to find than standard sizes.
Your pre-purchase checklist for a fat tire commuter:
- Check Q-factor specifications: A wider pedal stance can cause hip and knee discomfort on long rides.
- Test compatibility: Before purchasing, verify the bike fits on your local bus and train bike racks.
- Verify tire availability: Check the cost and availability of replacement tires and tubes in your area.
- Calculate range impact: Factor in the significant rolling resistance’s effect on your actual commute distance and battery life.
- Consider weight and storage: Assess the impact of the bike’s added weight when carrying it upstairs or finding storage space.
While fat bikes excel on sand, snow, and rugged trails, their inherent inefficiencies and logistical challenges make them a poor tool for the job of urban commuting. A bike with moderately wide, high-quality standard tires and perhaps a suspension seatpost will almost always be a faster, more efficient, and more practical choice.
Modular Frames: Buying a Bike That Grows with Your Family
A bike’s utility extends far beyond just the frame. Its ability to adapt to your changing needs—from carrying groceries to transporting a child—depends on its modularity. Historically, high-step frames had an advantage here, as the top tube offered an extra, convenient place to mount water bottles or frame bags. However, modern frame design has shifted the focus to standardized, integrated mounting systems that make both high-step and step-through frames incredibly versatile.
The key to this new level of adaptability lies in a few competing but highly effective systems like MIK, Racktime, and Ortlieb QL. These are not just simple bolt-on racks; they are integrated platforms that allow for the tool-free, near-instantaneous swapping of a huge range of accessories. With a simple “click,” you can switch from a grocery basket to a child seat or from panniers to a trunk bag. This turns the bike from a single-purpose vehicle into a true cargo-hauling platform that can be reconfigured in seconds to suit the day’s task.
When evaluating a new bike, looking for compatibility with one of these systems is a way to future-proof your purchase. A frame that incorporates a MIK-compatible rear rack, for example, immediately gains access to an entire ecosystem of accessories from numerous brands. This is especially valuable for families, as a bike can easily transition from a commuter vehicle during the week to a family hauler for a weekend ride to the park. It ensures your investment grows with you, rather than becoming obsolete as your needs evolve.
This table outlines some of the most common modular systems and their compatible accessories.
| System Type | Attachment Method | Compatible Accessories |
|---|---|---|
| MIK System | Click-and-go mounting | Baskets, child seats, panniers, crates |
| Racktime | Snap-it adapter | Bags, baskets, boxes, child seats |
| Ortlieb QL3.1 | Quick-lock hooks | Panniers, trunk bags, basket bags |
| Universal Mounts | Bolted connections | Frame bags, bottle cages, pumps |
Ultimately, a frame’s long-term value is measured not just by its strength or comfort, but by its versatility. By prioritizing a frame with a robust modular system, you are choosing a bike that is ready for whatever life throws at it.
Why Linkage Steering Feels Twitchy at First (And How to Adapt)
Some modern cargo and utility bikes, particularly those with smaller front wheels or complex cargo platforms, employ linkage steering systems instead of a traditional direct fork. This design, where the handlebars are connected to the front wheel via a series of rods and pivots, can feel unnervingly “twitchy” or overly responsive to new riders. This sensation is not a flaw, but a characteristic of the geometry that requires a different piloting technique to master.
The “twitchiness” comes from the system’s altered leverage and trail characteristics. Unlike a direct fork, where handlebar input has a 1:1 relationship with wheel movement, a linkage system can be designed to be quicker at low speeds to improve maneuverability with a heavy load. The initial feeling of instability is often the result of the rider overcorrecting, using their arms to steer in the way they are accustomed to. The key to taming linkage steering is to shift the primary steering input from your hands to your hips.
As one professional cycling instructor advises, you must learn to “Steer with your hips, guide with your hands.” This means initiating turns by shifting your body weight and leaning the bike, using the handlebars only for small, subtle corrections. This technique takes advantage of the bike’s inherent stability. The following techniques can help you adapt:
- Start practicing in an empty parking lot at very slow speeds (5-8 mph).
- Focus intently on making turns by leaning and shifting your hips, keeping your arms relaxed.
- Gradually increase your speed; you’ll notice the bike becomes more stable and self-correcting at 15-20 mph.
- Practice smooth figure-8 patterns, starting wide and progressively tightening the turns as you gain confidence.
- If it’s a cargo bike, load the front cargo area incrementally to feel how the handling changes and adapt accordingly.
What at first feels like twitchiness will soon transform into a feeling of agile, responsive control. It’s a brief learning curve that unlocks the full potential of these highly capable and specialized utility bikes.
Step-Through vs Mid-Step: Which Offers the Best Balance?
The stark choice between a high-step and a step-through frame has led to the rise of a hybrid design: the mid-step or “low-step” frame. This design seeks to offer the best of both worlds: greater accessibility than a high-step, with better structural integrity than a pure step-through. It achieves this by retaining a portion of the top tube, which creates a partial but highly effective form of triangulation.
This small section of tube dramatically increases the frame’s torsional rigidity—its resistance to twisting. While a pure step-through relies on a single, heavily reinforced beam, the mid-step’s partial triangle provides a much more efficient structure for fighting the flex that occurs when cornering or carrying a heavy load. This is particularly important for e-bikes, where higher motor torques can exacerbate frame flex. As the comparative table shows, this makes mid-step designs a sweet spot for motors in the 50-70Nm range, offering a solid platform without the full mounting challenge of a high-step frame.
The image below clearly shows the geometric progression from the single-beam step-through, to the partially triangulated mid-step, to the fully triangulated high-step frame.
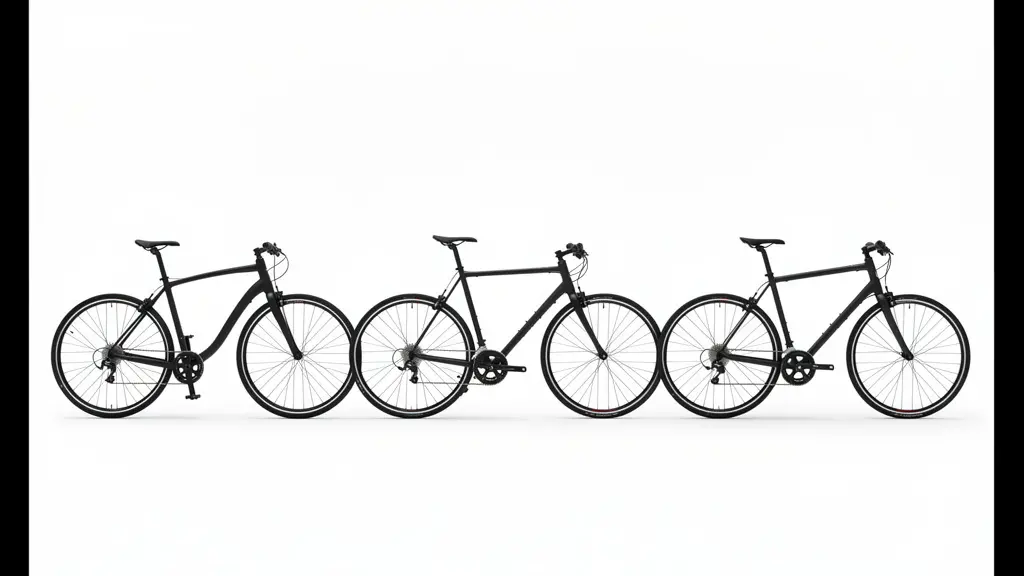
This design compromise makes the mid-step frame an excellent all-around choice. It provides easy, confident mounting and dismounting for most riders while retaining a level of stiffness and performance that is noticeably superior to a step-through. It bridges the gap, offering a tangible increase in handling performance and load-bearing confidence without requiring a full leg swing to get on and off.
| Frame Type | Torsional Rigidity | Mounting Ease | Best Motor Torque |
|---|---|---|---|
| Step-Through | Lower – single beam design | Easiest – no leg lift required | Up to 50Nm |
| Mid-Step | Medium – partial triangulation | Moderate – low barrier | 50-70Nm |
| High-Step | Highest – full triangle | Challenging – full leg swing | 70Nm+ |
For the rider who wants better performance than a step-through but still values easy access, the mid-step frame often represents the ideal, no-compromise solution.
Key takeaways
- Frame choice is an engineering decision, not a gendered one; it’s about matching structural integrity to your lifestyle.
- High-step frames offer superior torsional rigidity due to triangulation, making them better for heavy loads and performance riding.
- Step-through and mid-step frames provide accessibility and a lower center of gravity but require more material and reinforcement to achieve stiffness, impacting weight and handling.
Step-Through Frames: Why Accessibility Matters for Riders Over 60
While we’ve focused heavily on the engineering trade-offs of frame design, it’s crucial to return to the primary benefit of the step-through: accessibility. For many riders, especially those over 60 or individuals managing joint pain, flexibility issues, or balance concerns, the step-through frame is not just a convenience; it’s an enabler. It is the single most important feature that allows them to continue cycling safely and confidently, preserving their mobility and independence.
The simple act of mounting and dismounting a bike can become a significant barrier. A high top tube requires a degree of balance and flexibility that may diminish with age or be compromised by an injury. The step-through design removes this barrier entirely. As one rider with mobility challenges shared, “I was happy I could get a Step-Thru frame to make it easier to get on it with my bad knee.” This simple statement captures the profound impact of this design. It transforms cycling from a potentially daunting or risky activity back into an accessible and joyful one.
Modern step-through designs are also incredibly accommodating. Well-designed frames can support a massive range of rider heights, with some models offering a saddle height range from 745mm to 946mm, comfortably fitting a wide variety of body types. The lower center of gravity inherent in the design also provides a greater sense of stability, especially when stopping and starting in traffic, allowing a rider to easily put a foot down. This feeling of security is paramount for building and maintaining riding confidence.
The conversation about frame stiffness and payload is important, but it should not overshadow the human factor. For a significant portion of the population, the accessibility of a step-through frame isn’t a “feature”—it’s the entire reason they are able to ride at all. It represents a commitment to inclusive design that keeps people active, engaged, and mobile throughout their lives.
Now that you understand the engineering behind each frame, assess your daily routes, cargo needs, and physical requirements to make an informed choice that will serve you for years to come.